|
You could do this:
|

Friday 13 February 2015
count specific character in string Asp.Net
Wednesday 4 February 2015
What is AngularJS?
AngularJS is a JavaScript framework for organizing HTML code in a
more structural, clear and succinct mode. This client-side technology
provides easy and light code in order to make developing and even
designing as a simple task. AngularJS eliminates most of redundant code
specially in CRUD web application. It is a MV(Whatever you like) pattern
and not just a MVC.
There are two kinds of accessories which help us to make a bridge between user interface and the core of business and data layer.
Library: These types are set of functions such as JQuery and whenever you use some of them ($.ajax) it will call related function to handle functions.
Frameworks: These types are specific structure for implementation application and developer have to follow these structure. Such as durandal and ember.
AngularJS has different approach to work out our needs, angular embeds new properties inside HTML tags such as “ng-model”, “ng-repeat” which are known as Directives in order to fade our barriers to match and transform data.
On the other hand AngularJS has mingled Ajax and HTML DOM in a good structure which I will describe it more as follow:
Angular Advantages:
- It is very good for CRUD web application
- It makes testing easy in CRUD web application
- You need to write less code
- You can run your code more quickly
- One of the most popular and famous features in the AngularJS is two way and simple binding
- You do not need to modify HTML DOM
- By the aid of directives your tasks are more easy and time saving
- By its architecture in MVC or in the better word MVW, decoupling is real and excellent
Monday 2 February 2015
ASP.NET Application Development Using MVC
Overview
ASP.NET provides the MVC framework as an alternate to the ASP.NET Web Forms pattern for developing web applications. MVC (Model-View-Controller) is a lightweight, highly testable presentation framework that is integrated with the existing ASP.NET features such as Master Pages and Membership-based authentication.Introduction
TheSystem.Web.Mvc namespace is for ASP.NET MVC. MVC is a standard Design Pattern. MVC has the following components:- Controller Classes that handle incoming requests to the application, retrieve model data, and then specify view templates that return a response to the client.
- Model Classes that represent the data of the application and that use validation logic to enforce business rules for that data.
- View Template files that your application uses to dynamically generate HTML responses.
Background
In this demonstration, I will design a database using SQL Server Management Studio 2005. I will develop an ASP.NET MVC application and will describe all of its parts.Let’s Get Started
Open SQL Management Studio 2005. Crate a database and name it Inventory. Design a database table like below: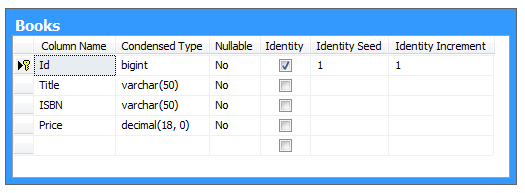
Figure 1
- Open Microsoft Visual Studio 2010
- Create a new project (File> New> Project> Visual C#): ASP.NET MVC 3 Web Application
- Named it ASPNETMVCApplication
- Click on the OK button
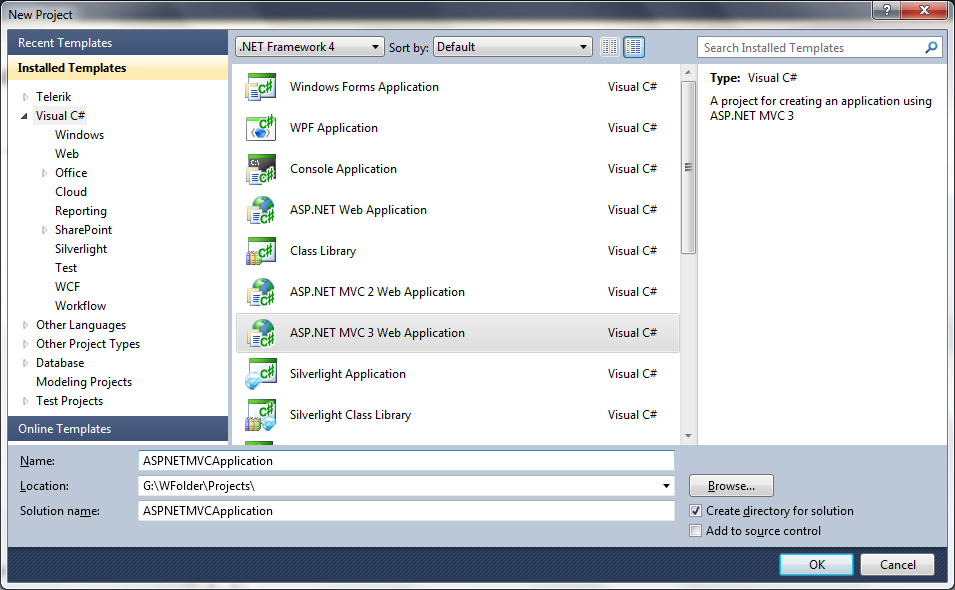
Figure 2
- Select a template for Internet Application
- View engine to Razor
- Create a unit test project to uncheck
- Click on the OK button

Figure 3
The default project will be created. Now Add Library Package Reference.
We will use a .NET Framework data-access technology known as the Entity
Framework. The Entity Framework (often referred to as “EF”) supports a
development paradigm called code-first. Code-first allows you to create
model objects by writing simple classes. You can then have the database
created on the fly from your classes, which enables a very clean and
rapid development workflow.We'll start by using the NuGet package manager (automatically installed by ASP.NET MVC 3) to add the EFCodeFirst library to the ASPNETMVCApplication project. This library lets us use the code-first approach. To add Entity Framework reference:
From the Tools menu, select Library Package Manager and then Add Library Package Reference.
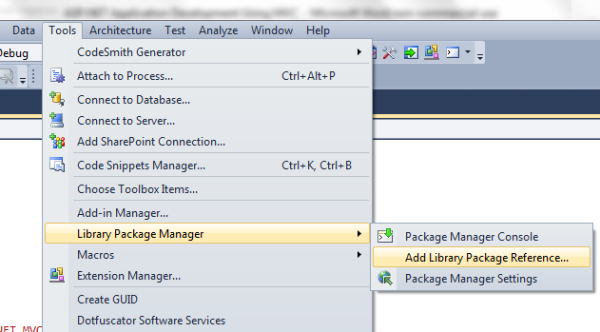
Figure 4
In the Add Library Package Reference window, click online.
Figure 5
Click the NuGet Official package source.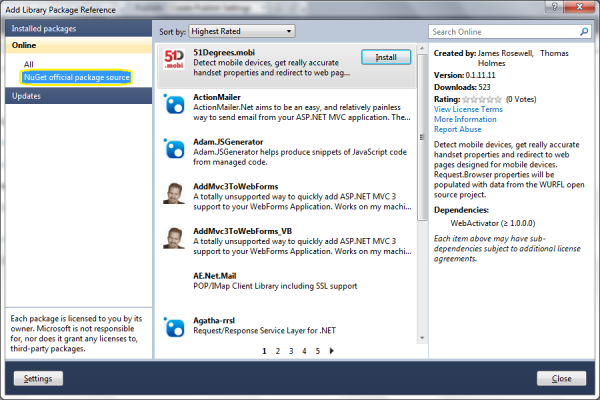
Figure 6
Find EFCodeFirst, click on install.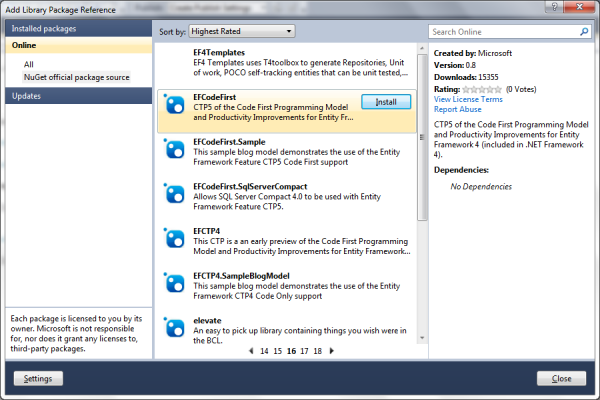
Figure 7
Click on I Accept. Entity Framework will install and will add a reference to the project.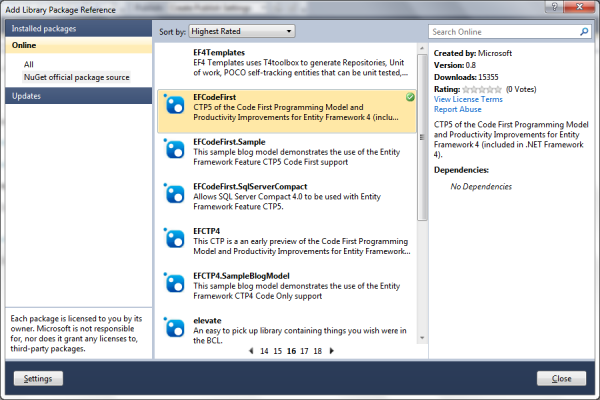
Figure 8
Click on the Close button.
Figure 9
Adding a Model Class
- Right click on Models from Solution Explorer
- Select Add
- Select Class
- Name it Book.cs

Figure 10
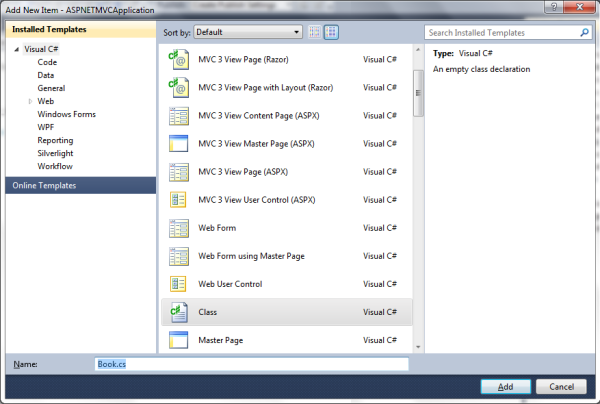
Figure 11
Add the following properties in the Book.cs file:namespace ASPNETMVCApplication.Models
{
public class Book
{
public Int64 Id { get; set; }
public String Title { get; set; }
public String ISBN { get; set; }
public Decimal Price { get; set; }
}
}
Add another class the way you did for Book.cs and name it BookDBContext.cs. Add a System.Data.Entity namespace reference in the BookDBContext.cs file.using System.Data.Entity;
Add the following code in the BookDBContext class. And derive it from the DbContext class so that all data operations can be handled by the Books property.Note: The property name
Books must be the same as the database table name Books.Here is the complete code:
using System;
using System.Web;
using System.Data.Entity;

namespace ASPNETMVCApplication.Models
{
    public class BookDBContext:DbContext
    {
        public DbSet<Book> Books { get; set; }
    }
}
Add a connection string in the web.config file. Remember, the connection string name must be the same as BookDBContext.<connectionStrings>
<add name="BookDBContext"
connectionString="data source=Home-PC;
uid=sa;pwd=1234;Initial Catalog=Inventory"
providerName="System.Data.SqlClient" />
</connectionStrings>
Adding the Controller
- Right click on Controller from Solution Explorer
- Select Add
- Select Controller
- Name it BookController
- Add action methods for Create, Update, Delete, and Details scenarios to Checked

Figure 12
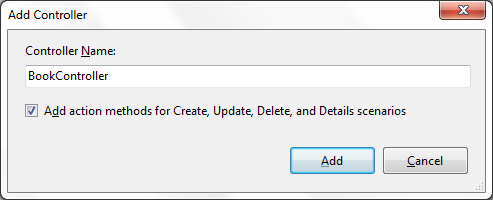
Figure 13
It will add the following code:namespace ASPNETMVCApplication.Controllers
{
public class BookController : Controller
{
//
// GET: /Book/
public ActionResult Index()
{
return View();
}
//
// GET: /Book/Details/5
public ActionResult Details(int id)
{
return View();
}
//
// GET: /Book/Create
public ActionResult Create()
{
return View();
}
//
// POST: /Book/Create
[HttpPost]
public ActionResult Create(FormCollection collection)
{
try
{
// TODO: Add insert logic here
return RedirectToAction("Index");
}
catch
{
return View();
}
}
//
// GET: /Book/Edit/5
public ActionResult Edit(int id)
{
return View();
}
//
// POST: /Book/Edit/5
[HttpPost]
public ActionResult Edit(int id, FormCollection collection)
{
try
{
// TODO: Add update logic here
return RedirectToAction("Index");
}
catch
{
return View();
}
}
//
// GET: /Book/Delete/5
public ActionResult Delete(int id)
{
return View();
}
//
// POST: /Book/Delete/5
[HttpPost]
public ActionResult Delete(int id, FormCollection collection)
{
try
{
// TODO: Add delete logic here
return RedirectToAction("Index");
}
catch
{
return View();
}
}
}
}
Now add the following namespaces in the BookController.cs file:using System.Linq;
using ASPNETMVCApplication.Models;
Declare a global instance variable of the BookDBContext class in the BookController class.BookDBContext _db = new BookDBContext();
Add the following code in the Index() method:public ActionResult Index()
{
var books = from book in _db.Books
select book;
return View(books.ToList());
}
This is the LINQ code for getting books and books.ToList() to display the book list in the View.Now right click on Solution and select Build to build the solution.
Adding the View
- Right click in the Index method
- Select View
- Create a strongly-typed view to Checked
- Select Model class to Book (ASPNETMVCApplication.Models)
- Scaffold template to List
- Click on the OK button
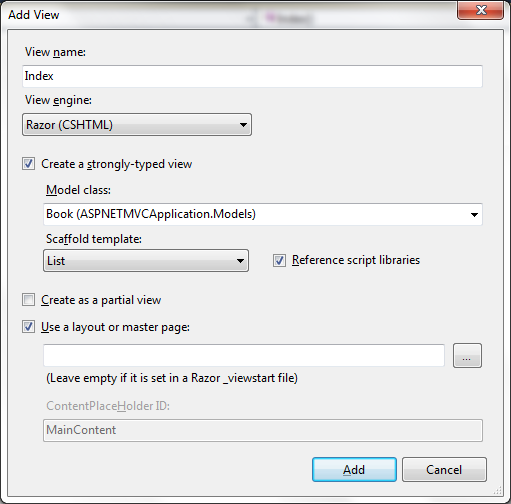
Figure 14
It will add the Index.cshtml file.@model IEnumerable<ASPNETMVCApplication.Models.Book>
@{
ViewBag.Title = "Index";
}
<h2>Index</h2>
<p>
@Html.ActionLink("Create New", "Create")
</p>
<table>
<tr>
<th></th>
<th>
Title
</th>
<th>
ISBN
</th>
<th>
Price
</th>
</tr>
@foreach (var item in Model) {
<tr>
<td>
@Html.ActionLink("Edit", "Edit", new { id=item.Id }) |
@Html.ActionLink("Details", "Details", new { id=item.Id }) |
@Html.ActionLink("Delete", "Delete", new { id=item.Id })
</td>
<td>
@item.Title
</td>
<td>
@item.ISBN
</td>
<td>
@String.Format("{0:F}", item.Price)
</td>
</tr>
}
</table>
Now, add the Create View.Adding the Create View
- Right click on the Create method
- Select View
- Create a strongly-typed view to Checked
- Select Model class to Book (ASPNETMVCApplication.Models)
- Scaffold template to Create
- Click on the OK button
@model ASPNETMVCApplication.Models.Book

@{
    ViewBag.Title = "Create";
}

<h2>Create</h2><script src="@Url.Content("~/Scripts/jquery.validate.min.js")"
  type="text/javascript"></script><script
  src="@Url.Content("~/Scripts/jquery.validate.unobtrusive.min.js")"
  type="text/javascript"></script>@using (Html.BeginForm()) {
    @Html.ValidationSummary(true)
    <fieldset>
        <legend>Book</legend><div class="editor-label">
            @Html.LabelFor(model => model.Title)
        </div>
        <div class="editor-field">
            @Html.EditorFor(model => model.Title)
            @Html.ValidationMessageFor(model => model.Title)
        </div>

        <div class="editor-label">
            @Html.LabelFor(model => model.ISBN)
        </div>
        <div class="editor-field">
            @Html.EditorFor(model =>
Now add the following code in the Create method in the BookController class.[HttpPost]
public ActionResult Create(FormCollection collection)
{
try
{
Book book = new Book();
if (ModelState.IsValid)
{
book.Title = collection["Title"].ToString();
book.ISBN = collection["ISBN"].ToString();
book.Price = Convert.ToDecimal(collection["Price"]);
_db.Books.Add(book);
_db.SaveChanges();
return RedirectToAction("Index");
}
else
{
return View(book);
}
}
catch
{
return View();
}
}
Now we will add the Edit View.Adding the Edit View
- Right click on the Edit method
- Select View
- Create a strongly-typed view to Checked
- Select Model class to Book (ASPNETMVCApplication.Models)
- Scaffold template to Edit
- Click on the OK button

Figure 15
It will add the Edit.cshtml file:@model ASPNETMVCApplication.Models.Book
@{
ViewBag.Title = "Edit";
}
<h2>Edit</h2><script src="@Url.Content("~/Scripts/jquery.validate.min.js")"
type="text/javascript"></script><script
src="@Url.Content("~/Scripts/jquery.validate.unobtrusive.min.js")"
type="text/javascript"></script>@using (Html.BeginForm()) {
@Html.ValidationSummary(true)
<fieldset>
<legend>Book</legend>@Html.HiddenFor(model => model.Id)
<div class="editor-label">
@Html.LabelFor(model => model.Title)
</div>
<div class="editor-field">
@Html.EditorFor(model => model.Title)
@Html.ValidationMessageFor(model => model.Title)
</div>
<div class="editor-label">
@Html.LabelFor(model => model.ISBN)
</div>
<div class="editor-field">
@Html.EditorFor(model =>
Now add the following code in the Edit method in the BookController class.public ActionResult Edit(int id)
{
Book book = _db.Books.Find(id);
if (book == null)
return RedirectToAction("Index");
return View(book);
}
[HttpPost]
public ActionResult Edit(int id, FormCollection collection)
{
try
{
var book = _db.Books.Find(id);
UpdateModel(book);
_db.SaveChanges();
return RedirectToAction("Index");
}
catch
{
ModelState.AddModelError("", "Edit Failure, see inner exception");
return View();
}
}
Now we will add the Details View.Adding the Details View
- Right click on the Edit method
- Select View
- Create a strongly-typed view to Checked
- Select Model class to Book (ASPNETMVCApplication.Models)
- Scaffold template to Details
- Click on the OK button

Figure 16
It will add the Details.cshtml file:@model ASPNETMVCApplication.Models.Book
@{
ViewBag.Title = "Details";
}
<h2>Details</h2><fieldset>
<legend>Book</legend><div class="display-label">Title</div>
<div class="display-field">@Model.Title</div>
<div class="display-label">ISBN</div>
<div class="display-field">@Model.ISBN</div>
<div class="display-label">Price</div>
<div class="display-field">@String.Format("{0:F}", Model.Price)</div>
</fieldset>
<p>
@Html.ActionLink("Edit", "Edit", new { id=Model.Id }) |
@Html.ActionLink("Back to List", "Index")
</p>
Add the following code to the Details method of the BookController class.public ActionResult Details(int id)
{
Book book = _db.Books.Find(id);
if (book == null)
return RedirectToAction("Index");
return View("Details", book);
}
Now we will add the Delete View.Adding the Delete View
- Right click on the Edit method
- Select View
- Create a strongly-typed view to Checked
- Select Model class to Book (ASPNETMVCApplication.Models)
- Scaffold template to Delete
- Click on the OK button

Figure 17
It will add the Delete.cshtml file.@model ASPNETMVCApplication.Models.Book
@{
ViewBag.Title = "Delete";
}
<h2>Delete</h2><h3>Are you sure you want to delete this?</h3><fieldset>
<legend>Book</legend><div class="display-label">Title</div>
<div class="display-field">@Model.Title</div>
<div class="display-label">ISBN</div>
<div class="display-field">@Model.ISBN</div>
<div class="display-label">Price</div>
<div class="display-field">@String.Format("{0:F}", Model.Price)</div>
</fieldset>
@using (Html.BeginForm()) {
<p>
<input type="submit" value="Delete" /> |
@Html.ActionLink("Back to List", "Index")
</p>
}
Add the following code to the Delete method in the BookController class.public ActionResult Delete(int id)
{
Book book = _db.Books.Find(id);
if (book == null)
return RedirectToAction("Index");
return View(book);
}
[HttpPost]
public ActionResult Delete(int id, FormCollection collection)
{
Book book = _db.Books.Find(id);
_db.Books.Remove(book);
_db.SaveChanges();
return RedirectToAction("Index");
}
Now run the application. Type /Book in the URL and remember that the port number may be different in your case.
Figure 17
Click Create New Link to add a new book.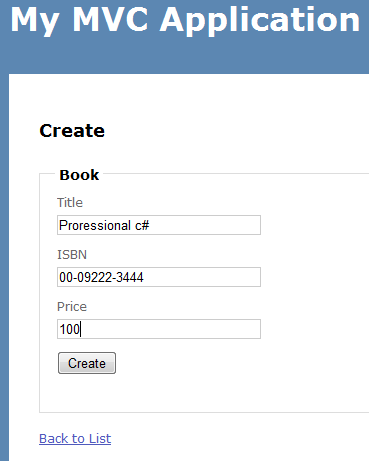
Figure 18
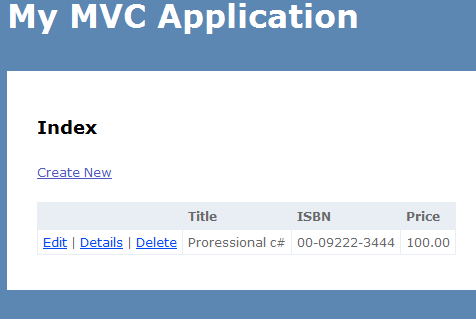
Figure 19
This way you can edit, delete, and view details of the books.Single Page Application (SPA) Web API ,Using AngularJS, and MVC 5
In traditional web applications, the client (browser) initiates the communication with the server by requesting a page. The server then processes the request and sends the HTML of the page to the client. In subsequent interactions with the page, for example the user navigates to a link or submits a form with data, a new request is sent to the server and the flow starts again. The server processes the request and sends a new page to the browser in response to the new action requested by the client.

Image 1.
In Single-Page Applications (SPAs) the entire page is loaded into the browser after the initial request, but subsequent interactions take place using Ajax requests. This means that the browser must update only the portion of the page that has changed; there is no need to reload the entire page. The SPA approach reduces the time taken by the application to respond to user actions, resulting in a more fluid experience.
Single-Page Applications (SPAs) are Web apps that load a single HTML page and dynamically update that page as the user interacts with the app.
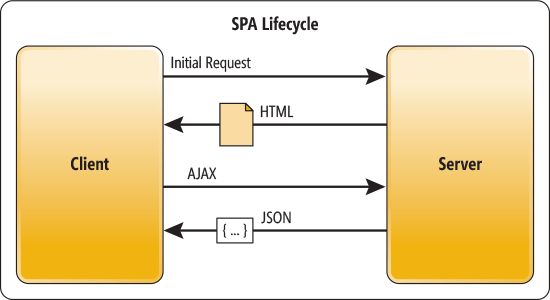
Image 2.
Now we will learn this by creating a sample application. In this SPA example I will do CRUD operations on the Student table using the Web API and MVC.
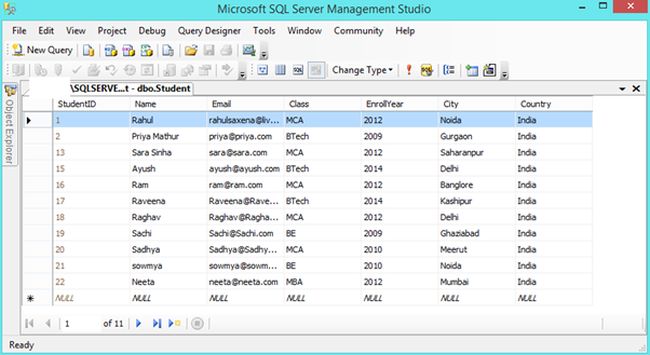
Image 3.
The following is my Data Table in design mode:
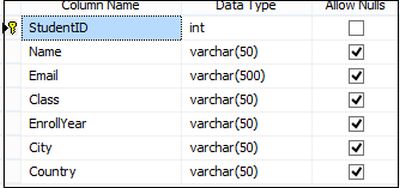
Image 4.
The script of my Student Table is:
- CREATE TABLE [dbo].[Student](
- [StudentID] [int] IDENTITY(1,1) NOT NULL,
- [Name] [varchar](50) NULL,
- [Email] [varchar](500) NULL,
- [Class] [varchar](50) NULL,
- [EnrollYear] [varchar](50) NULL,
- [City] [varchar](50) NULL,
- [Country] [varchar](50) NULL,
- CONSTRAINT [PK_Student] PRIMARY KEY CLUSTERED
- (
- [StudentID] ASC
- )WITH (PAD_INDEX = OFF, STATISTICS_NORECOMPUTE = OFF, IGNORE_DUP_KEY = OFF, ALLOW_ROW_LOCKS = ON, ALLOW_PAGE_LOCKS = ON) ON [PRIMARY]
- ) ON [PRIMARY]
- GO
- SET ANSI_PADDING OFF
- GO
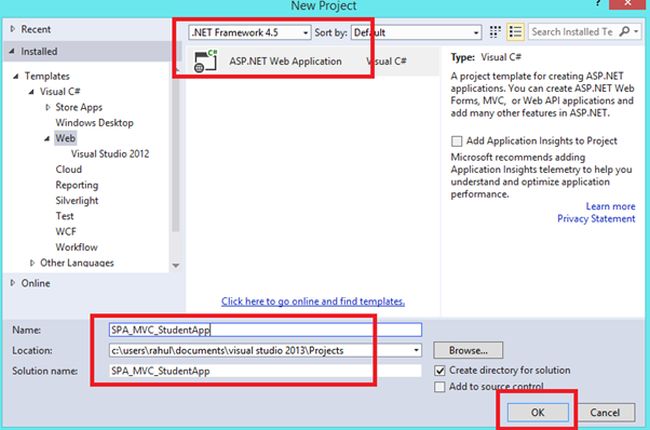
Image 5.
Select Web -> ASP.NET Web Application then provide I a name. Then click OK.
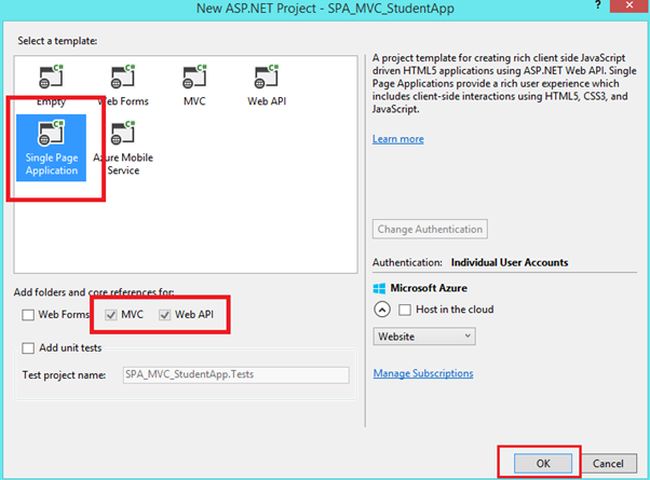
Image 6.
Select Single Page Application from the template option. Then click OK.
Now right-click on the Models Folder then select Add -> ADO.NET Entity Data Model.
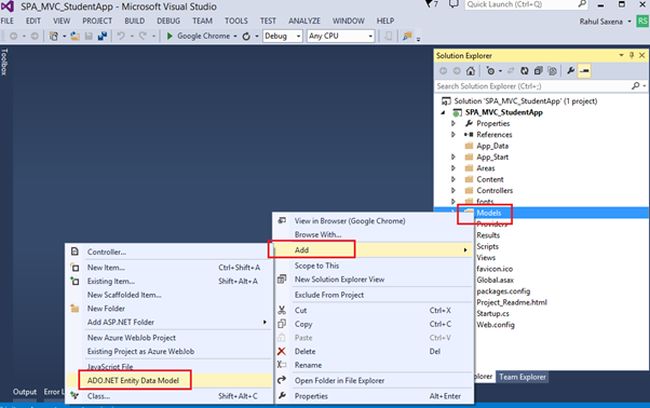
Image 7.
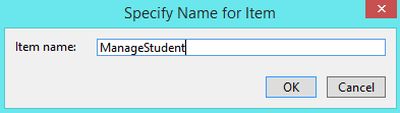
Image 8.
Provide It a name.
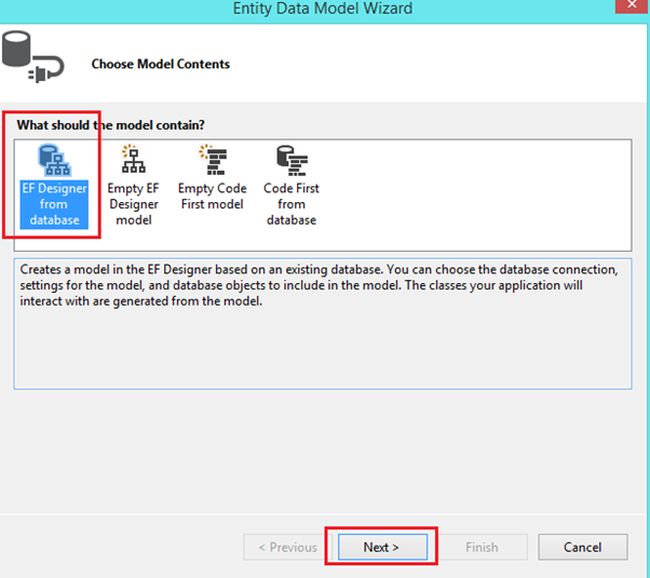
Image 9.
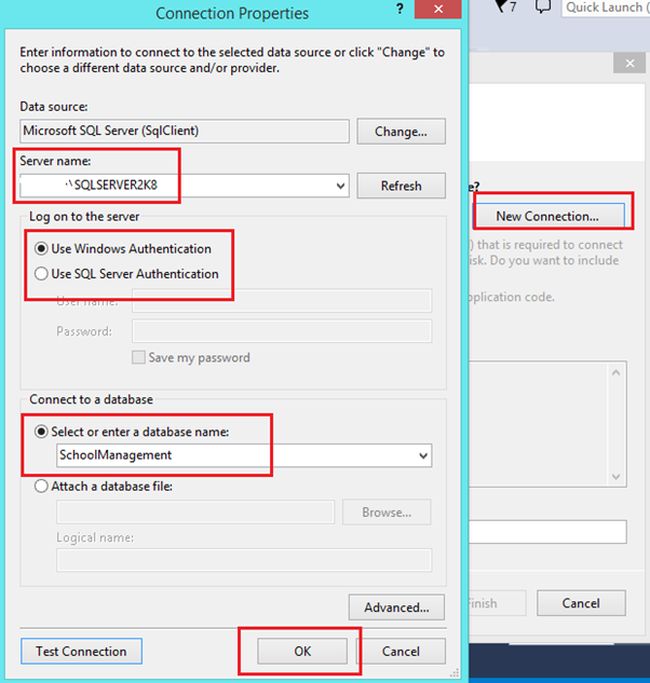
Image 10.
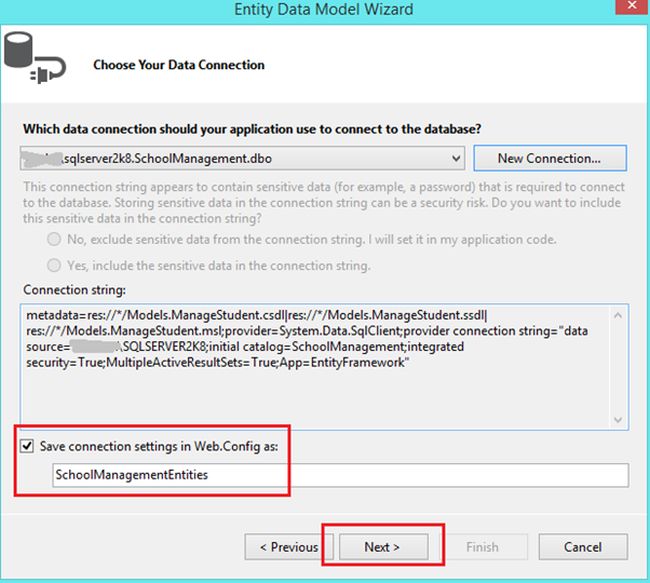
Image 11.
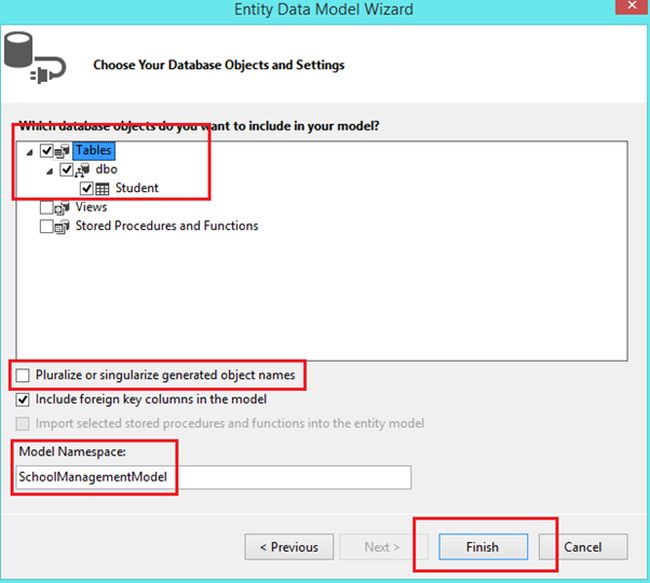
Image 12.
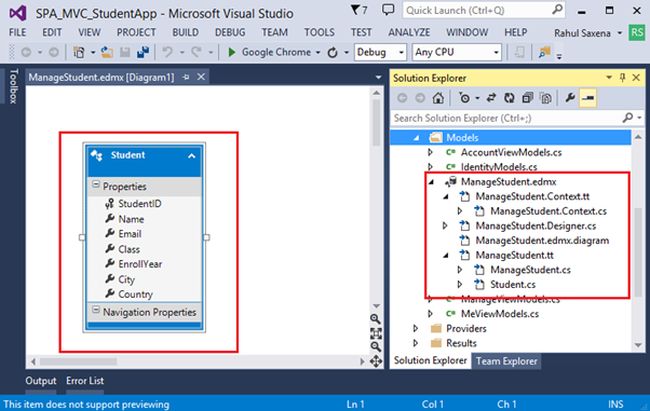
Image 13.
Now we will add AngularJS references using NuGet. Right-click on Solution Explorer.

Image 14.
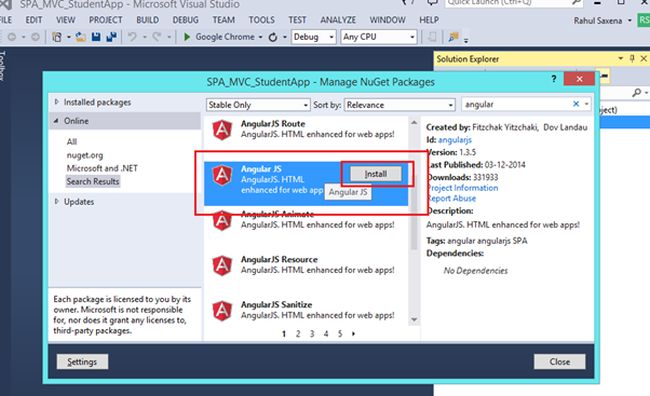
Image 15.
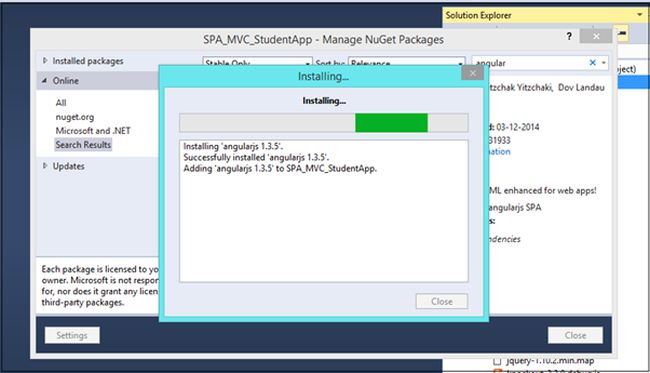
Image 16.
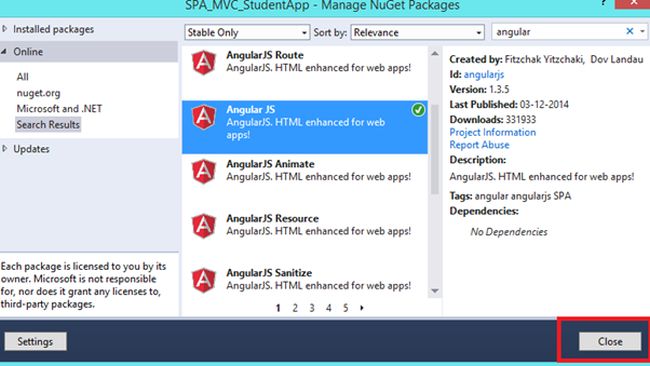
Image 17.
Now we will add a Web API so right-click on the controller folder then select Add -> Controller.

Image 18.
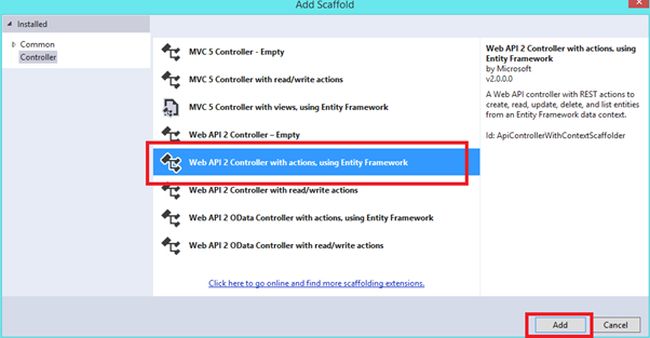
Image 19.
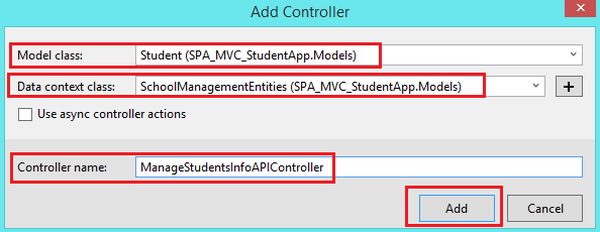
Image 20.
ManageStudentsInfoAPIController.cs is:
- using System;
- using System.Collections.Generic;
- using System.Data;
- using System.Data.Entity;
- using System.Data.Entity.Infrastructure;
- using System.Linq;
- using System.Net;
- using System.Net.Http;
- using System.Web.Http;
- using System.Web.Http.Description;
- using SPA_MVC_StudentApp.Models;
- namespace SPA_MVC_StudentApp.Controllers
- {
- public class ManageStudentsInfoAPIController : ApiController
- {
- private SchoolManagementEntities db = new SchoolManagementEntities();
- // GET: api/ManageStudentsInfoAPI
- public IQueryable<Student> GetStudent()
- {
- return db.Student;
- }
- // GET: api/ManageStudentsInfoAPI/5
- [ResponseType(typeof(Student))]
- public IHttpActionResult GetStudent(int id)
- {
- Student student = db.Student.Find(id);
- if (student == null)
- {
- return NotFound();
- }
- return Ok(student);
- }
- // PUT: api/ManageStudentsInfoAPI/5
- [ResponseType(typeof(void))]
- public IHttpActionResult PutStudent(int id, Student student)
- {
- if (!ModelState.IsValid)
- {
- return BadRequest(ModelState);
- }
- if (id != student.StudentID)
- {
- return BadRequest();
- }
- db.Entry(student).State = EntityState.Modified;
- try
- {
- db.SaveChanges();
- }
- catch (DbUpdateConcurrencyException)
- {
- if (!StudentExists(id))
- {
- return NotFound();
- }
- else
- {
- throw;
- }
- }
- return StatusCode(HttpStatusCode.NoContent);
- }
- // POST: api/ManageStudentsInfoAPI
- [ResponseType(typeof(Student))]
- public IHttpActionResult PostStudent(Student student)
- {
- if (!ModelState.IsValid)
- {
- return BadRequest(ModelState);
- }
- db.Student.Add(student);
- db.SaveChanges();
- return CreatedAtRoute("DefaultApi", new { id = student.StudentID }, student);
- }
- // DELETE: api/ManageStudentsInfoAPI/5
- [ResponseType(typeof(Student))]
- public IHttpActionResult DeleteStudent(int id)
- {
- Student student = db.Student.Find(id);
- if (student == null)
- {
- return NotFound();
- }
- db.Student.Remove(student);
- db.SaveChanges();
- return Ok(student);
- }
- protected override void Dispose(bool disposing)
- {
- if (disposing)
- {
- db.Dispose();
- }
- base.Dispose(disposing);
- }
- private bool StudentExists(int id)
- {
- return db.Student.Count(e => e.StudentID == id) > 0;
- }
- }
- }
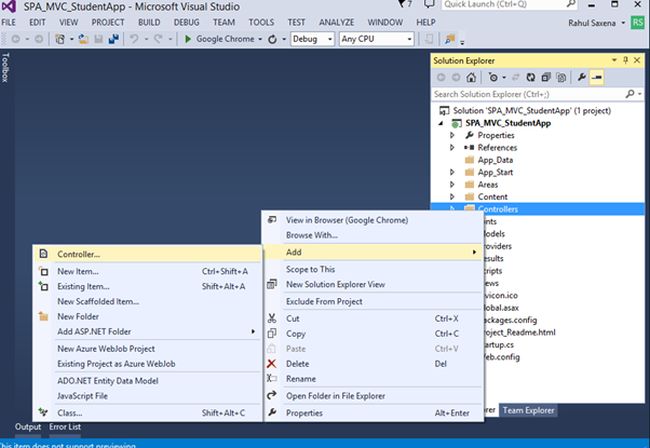
Image 21.
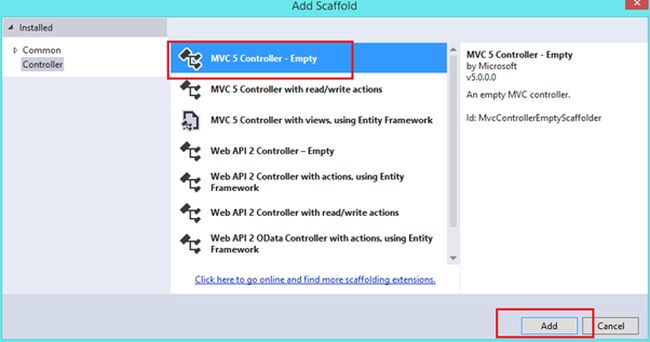
Image 22.
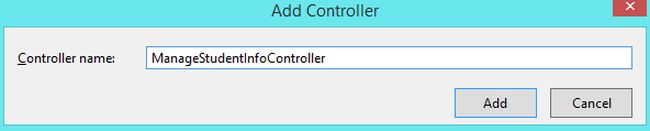
Image 23.
After adding ManageStudentInfo Controller we need to add a view.
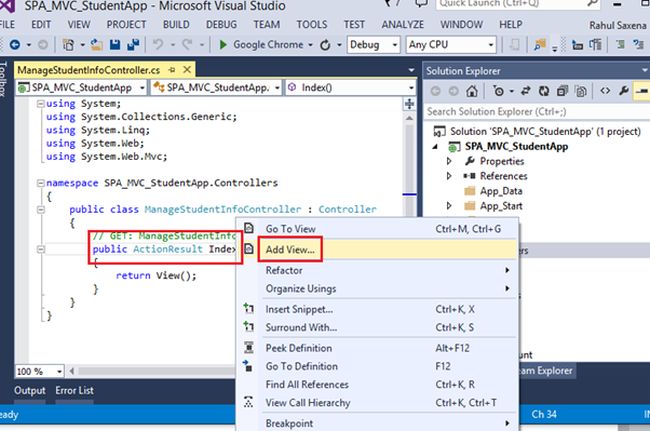
Image 24.
Index.cshtml
- @{
- ViewBag.Title = "SPA";
- Layout = "~/Views/Shared/_Layout.cshtml";
- }
- <link href="~/Content/bootstrap.min.css" rel="stylesheet" />
- <body data-ng-app="ApplicationModule">
- <div>
- <div>
- <div>
- <table cellpadding="5" cellspacing="6" width="100%" style="background-color:whitesmoke; border:solid 4px green;">
- <tr>
- <td style="border: solid 1px gray; width:170px; text-align:center;"><a href="showstudents"> Show All Students </a></td>
- <td style="border: solid 1px gray; width:170px; text-align:center;"><a href="addstudent"> Add New Student </a></td>
- <td></td>
- </tr>
- </table>
- </div>
- <div>
- <div data-ng-view></div>
- </div>
- </div>
- </div>
- </body>
- @section scripts{
- <script type="text/javascript" src="@Url.Content("~/Scripts/angular.js")"></script>
- <script type="text/javascript" src="@Url.Content("~/Scripts/angular-route.min.js")"></script>
- <script type="text/javascript" src="@Url.Content("~/MyScripts/Module.js")"></script>
- <script src="~/MyScripts/Services.js"></script>
- <script type="text/javascript" src="@Url.Content("~/MyScripts/ShowStudentsController.js")"></script>
- <script type="text/javascript" src="@Url.Content("~/MyScripts/AddStudentController.js")"></script>
- <script type="text/javascript" src="@Url.Content("~/MyScripts/EditStudentController.js")"></script>
- <script type="text/javascript" src="@Url.Content("~/MyScripts/DeleteStudentController.js")"></script>
- }
Here in this example we will perform the following operations:
- ShowAllStudent
- AddStudent
- EditStudent
- DeleteStudent
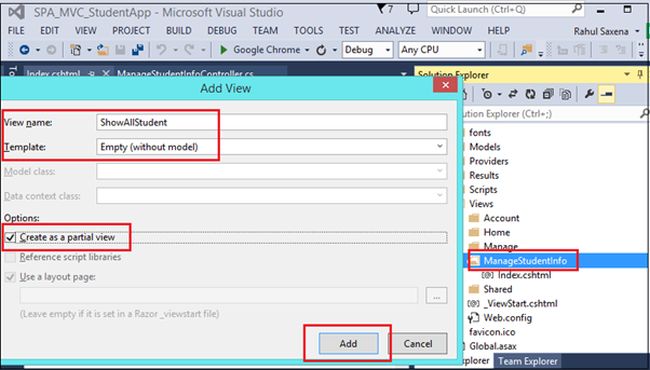
Image 25.
ShowAllStudent.cshtml
- <table><tr><td height="10px"></td></tr></table>
- <table cellpadding="4" cellspacing="4" width="90%" align="center"
- style="background-color: skyblue; border:solid 2px red; padding-top:20px;">
- <thead>
- <tr style="background-color:#F5F5F5;">
- <th>Student ID</th>
- <th>Name</th>
- <th>Email</th>
- <th>Class</th>
- <th>Enroll Year</th>
- <th>City</th>
- <th>Country</th>
- <th></th>
- <th></th>
- </tr>
- </thead>
- <tbody>
- <tr data-ng-repeat="Stud in Students">
- <td>{{Stud.studentID}}</td>
- <td>{{Stud.name}}</td>
- <td>{{Stud.email}}</td>
- <td>{{Stud.class}}</td>
- <td>{{Stud.enrollYear}}</td>
- <td>{{Stud.city}}</td>
- <td>{{Stud.country}}</td>
- <td><a ng-click="editStudent(Stud.studentID)">Edit</a></td>
- <td><a ng-click="deleteStudent(Stud.studentID)">Delete</a></td>
- </tr>
- </tbody>
- </table>
AddStudent.cshtml
- @{
- ViewBag.Title = "Add New Student";
- }
- <table><tr><td height="10px"></td></tr></table>
- <table cellpadding="4" cellspacing="4" width="70%" align="center" style="background-color: skyblue;
- border:solid 2px red; padding-top:20px;">
- <tr><td colspan="3" style="background-color:gray; font-size:18pt;
- font-weight:bold; height:30px; text-align:center;">Add New Student</td></tr>
- <tr>
- <td style="text-align:right;">Student ID</td>
- <td><input type="text" ng-model="StudentID" /> </td>
- </tr>
- <tr>
- <td style="text-align:right;">Name</td>
- <td><input type="text" ng-model="Name" /> </td>
- </tr>
- <tr>
- <td style="text-align:right;">Email</td>
- <td><input type="text" ng-model="Email" /> </td>
- </tr>
- <tr>
- <td style="text-align:right;">Class</td>
- <td><input type="text" ng-model="Class" /> </td>
- </tr>
- <tr>
- <td style="text-align:right;">Enroll Year</td>
- <td><input type="text" ng-model="EnrollYear" /> </td>
- </tr>
- <tr>
- <td style="text-align:right;">City</td>
- <td><input type="text" ng-model="City" /> </td>
- </tr>
- <tr>
- <td style="text-align:right;">Country</td>
- <td><input type="text" ng-model="Country" /> </td>
- </tr>
- <tr>
- <td></td>
- <td>
- <input type="button" value="Save" data-ng-click="save()" />
- </td>
- </tr>
- </table>
- @{
- ViewBag.Title = "Delete Student";
- }
- <table><tr><td height="10px"></td></tr></table>
- <table cellpadding="4" cellspacing="4" width="70%" align="center" style="background-color: skyblue; border:solid 2px red; padding-top:20px;">
- <tr><td colspan="3" style="background-color:gray; font-size:18pt; font-weight:bold; height:30px; text-align:center;">Delete Student Information</td></tr>
- <tr>
- <td style="text-align:right;">Student ID</td>
- <td>{{Student.studentID}} </td>
- </tr>
- <tr>
- <td style="text-align:right;">Name # </td>
- <td> {{Student.name}} </td>
- </tr>
- <tr>
- <td style="text-align:right;">Email # </td>
- <td>{{Student.email}} </td>
- </tr>
- <tr>
- <td style="text-align:right;">Class # </td>
- <td>{{Student.class}} </td>
- </tr>
- <tr>
- <td style="text-align:right;">Enroll Year # </td>
- <td>{{Student.enrollYear}} </td>
- </tr>
- <tr>
- <td style="text-align:right;">City # </td>
- <td>{{Student.city}} </td>
- </tr>
- <tr>
- <td style="text-align:right;">Country # </td>
- <td>{{Student.country}} </td>
- </tr>
- <tr>
- <td></td>
- <td>
- <input type="button" value="Delete" ng-click="delete()" />
- </td>
- </tr>
- </table>
- @{
- ViewBag.Title = "Edit Student";
- }
- <table><tr><td height="10px"></td></tr></table>
- <table cellpadding="4" cellspacing="4" width="70%" align="center" style="background-color: skyblue; border:solid 2px red; padding-top:20px;">
- <tr><td colspan="3" style="background-color:gray; font-size:18pt; font-weight:bold; height:30px; text-align:center;">Edit Student Information</td></tr>
- <tr>
- <td style="text-align:right;">Student ID</td>
- <td><input type="text" ng-model="Student.studentID" /> </td>
- </tr>
- <tr>
- <td style="text-align:right;">Name</td>
- <td><input type="text" ng-model="Student.name" /> </td>
- </tr>
- <tr>
- <td style="text-align:right;">Email</td>
- <td><input type="text" ng-model="Student.email" /> </td>
- </tr>
- <tr>
- <td style="text-align:right;">Class</td>
- <td><input type="text" ng-model="Student.class" /> </td>
- </tr>
- <tr>
- <td style="text-align:right;">Enroll Year</td>
- <td><input type="text" ng-model="Student.enrollYear" /> </td>
- </tr>
- <tr>
- <td style="text-align:right;">City</td>
- <td><input type="text" ng-model="Student.city" /> </td>
- </tr>
- <tr>
- <td style="text-align:right;">Country</td>
- <td><input type="text" ng-model="Student.country" /> </td>
- </tr>
- <tr>
- <td></td>
- <td>
- <input type="button" value="Save" ng-click="save()" />
- <br />
- <div>{{error}}</div>
- </td>
- </tr>
- </table>
- using System;
- using System.Collections.Generic;
- using System.Linq;
- using System.Web;
- using System.Web.Mvc;
- namespace SPA_MVC_StudentApp.Controllers
- {
- public class ManageStudentInfoController : Controller
- {
- // GET: ManageStudentInfo
- public ActionResult Index()
- {
- return View();
- }
- public ActionResult AddNewStudent()
- {
- return PartialView("AddStudent");
- }
- public ActionResult ShowStudents()
- {
- return PartialView("ShowAllStudent");
- }
- public ActionResult EditStudent()
- {
- return PartialView("EditStudent");
- }
- public ActionResult DeleteStudent()
- {
- return PartialView("DeleteStudent");
- }
- }
- }
And add the following JavaScript files.
- Module.js
- Services.js
- ShowStudentsController.js
- AddStudentController.js
- EditStudentController.js
- DeleteStudentController.js
Module.js
- var app = angular.module("ApplicationModule", ["ngRoute"]);
- app.factory("ShareData", function () {
- return { value: 0 }
- });
- //Showing Routing
- app.config(['$routeProvider', '$locationProvider', function ($routeProvider, $locationProvider) {
- debugger;
- $routeProvider.when('/showstudents',
- {
- templateUrl: 'ManageStudentInfo/ShowStudents',
- controller: 'ShowStudentsController'
- });
- $routeProvider.when('/addstudent',
- {
- templateUrl: 'ManageStudentInfo/AddNewStudent',
- controller: 'AddStudentController'
- });
- $routeProvider.when("/editStudent",
- {
- templateUrl: 'ManageStudentInfo/EditStudent',
- controller: 'EditStudentController'
- });
- $routeProvider.when('/deleteStudent',
- {
- templateUrl: 'ManageStudentInfo/DeleteStudent',
- controller: 'DeleteStudentController'
- });
- $routeProvider.otherwise(
- {
- redirectTo: '/'
- });
- $locationProvider.html5Mode(true).hashPrefix('!')
- }]);
- app.service("SPACRUDService", function ($http) {
- //Read all Students
- this.getStudents = function () {
- return $http.get("/api/ManageStudentInfoAPI");
- };
- //Fundction to Read Student by Student ID
- this.getStudent = function (id) {
- return $http.get("/api/ManageStudentInfoAPI/" + id);
- };
- //Function to create new Student
- this.post = function (Student) {
- var request = $http({
- method: "post",
- url: "/api/ManageStudentInfoAPI",
- data: Student
- });
- return request;
- };
- //Edit Student By ID
- this.put = function (id, Student) {
- var request = $http({
- method: "put",
- url: "/api/ManageStudentInfoAPI/" + id,
- data: Student
- });
- return request;
- };
- //Delete Student By Student ID
- this.delete = function (id) {
- var request = $http({
- method: "delete",
- url: "/api/ManageStudentInfoAPI/" + id
- });
- return request;
- };
- });
- app.controller('ShowStudentsController', function ($scope, $location, SPACRUDService, ShareData) {
- loadAllStudentsRecords();
- function loadAllStudentsRecords()
- {
- var promiseGetStudent = SPACRUDService.getStudents();
- promiseGetStudent.then(function (pl) { $scope.Students = pl.data },
- function (errorPl) {
- $scope.error = errorPl;
- });
- }
- //To Edit Student Information
- $scope.editStudent = function (StudentID) {
- ShareData.value = StudentID;
- $location.path("/editStudent");
- }
- //To Delete a Student
- $scope.deleteStudent = function (StudentID) {
- ShareData.value = StudentID;
- $location.path("/deleteStudent");
- }
- });
- app.controller('AddStudentController', function ($scope, SPACRUDService) {
- $scope.StudentID = 0;
- $scope.save = function () {
- var Student = {
- StudentID: $scope.StudentID,
- Name: $scope.Name,
- Email: $scope.Email,
- Class: $scope.Class,
- EnrollYear: $scope.EnrollYear,
- City: $scope.City,
- Country: $scope.Country
- };
- var promisePost = SPACRUDService.post(Student);
- promisePost.then(function (pl) {
- alert("Student Saved Successfully.");
- },
- function (errorPl) {
- $scope.error = 'failure loading Student', errorPl;
- });
- };
- });
- app.controller("EditStudentController", function ($scope, $location, ShareData, SPACRUDService) {
- getStudent();
- function getStudent() {
- var promiseGetStudent = SPACRUDService.getStudent(ShareData.value);
- promiseGetStudent.then(function (pl)
- {
- $scope.Student = pl.data;
- },
- function (errorPl) {
- $scope.error = 'failure loading Student', errorPl;
- });
- }
- $scope.save = function () {
- var Student = {
- StudentID: $scope.Student.studentID,
- Name: $scope.Student.name,
- Email: $scope.Student.email,
- Class: $scope.Student.class,
- EnrollYear: $scope.Student.enrollYear,
- City: $scope.Student.city,
- Country: $scope.Student.country
- };
- var promisePutStudent = SPACRUDService.put($scope.Student.studentID, Student);
- promisePutStudent.then(function (pl)
- {
- $location.path("/showstudents");
- },
- function (errorPl) {
- $scope.error = 'failure loading Student', errorPl;
- });
- };
- });
- app.controller("DeleteStudentController", function ($scope, $location, ShareData, SPACRUDService) {
- getStudent();
- function getStudent() {
- var promiseGetStudent = SPACRUDService.getStudent(ShareData.value);
- promiseGetStudent.then(function (pl) {
- $scope.Student = pl.data;
- },
- function (errorPl) {
- $scope.error = 'failure loading Student', errorPl;
- });
- }
- $scope.delete = function () {
- var promiseDeleteStudent = SPACRUDService.delete(ShareData.value);
- promiseDeleteStudent.then(function (pl) {
- $location.path("/showstudents");
- },
- function (errorPl) {
- $scope.error = 'failure loading Student', errorPl;
- });
- };
- });
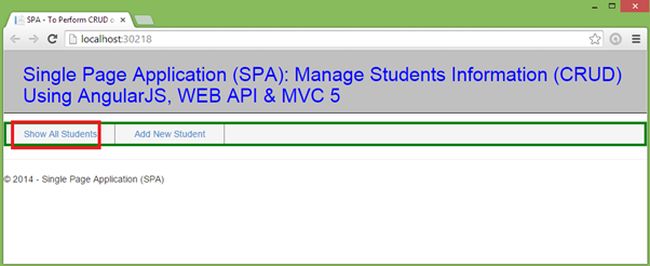
Image 26.
Now click on Show All Students.
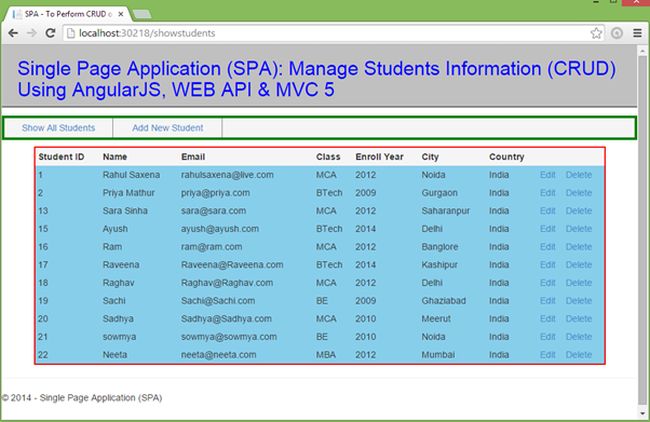
Image 27.
Now click on Add New Student.
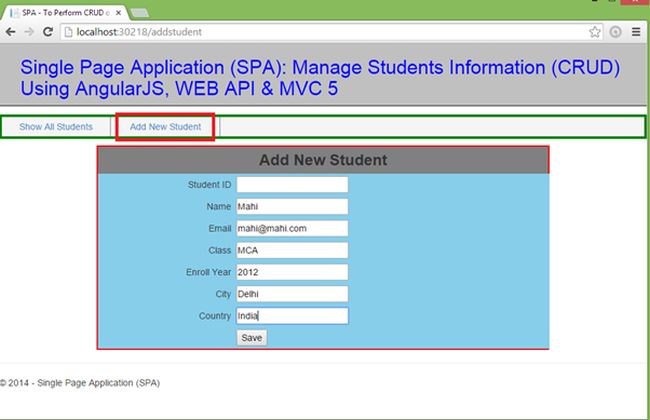
Image 28.
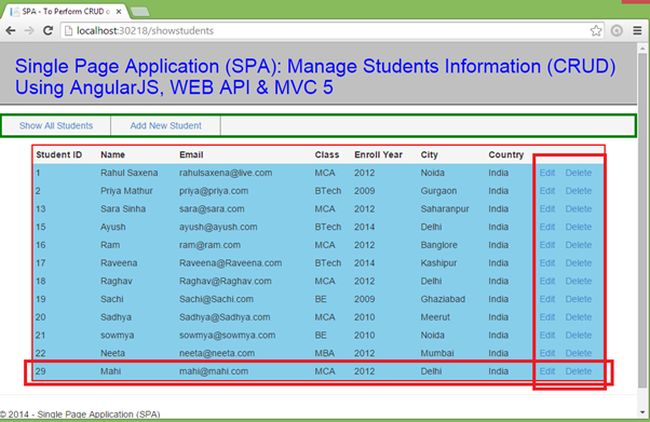
Image 29.
Now click on Edit.
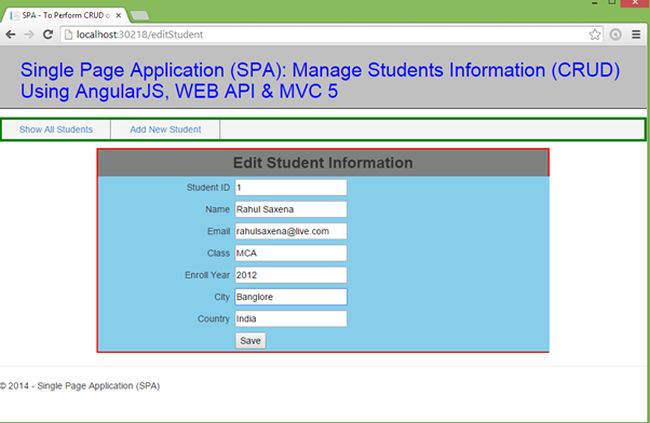
Image 30.
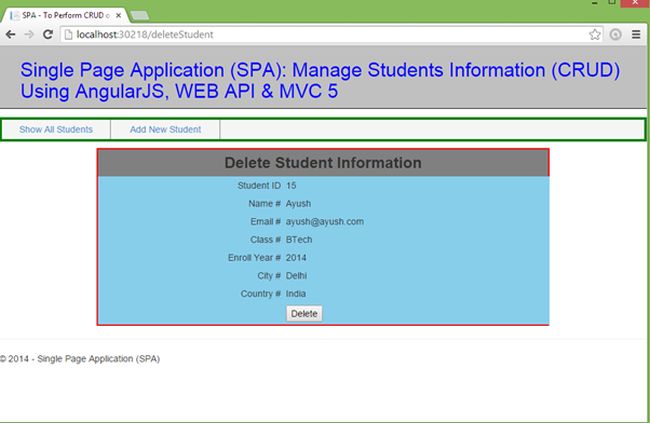
Image 31.
Subscribe to:
Posts (Atom)